How to validate react forms?
In this article we will look into a very important part of react form development. That is client-side validations. When it comes to validations there are two forms of validations programmers do in every project. First one is the client-side validation and the other is server side validations.
What is data validation?
In simple terms it is checking for accuracy of the inputs. For example for a required field, if the user doesn’t enter a value, should let the user know about it with a message and shouldn’t process the form until user input the required value. There can be various instances where we need to validate. Will look at them one by one.
Why data validation is important?
Data validation is an important part of application development. It hold the referential integrity of the data being fed into DB. Validation will filter garbage values and harmful scripts.
What is client-side data validation?
In short client-side is what the user interface. It can be a webpage or a window to enter data. Validating data then and there or on the user interface is called client-side validation.
What is server side data validations?
Server side validation happens once client-side validation is success and when user submit data for saving. When you submit a form that is the time it interact with backend. Developers should do another round of validations to ensure the accuracy of the data on the server.
I will not going to talk in detail about data validation in this article. Let’s jump into react world and kick off react validations. I’m not going to show you how to create webfroms using reactjs instead I’m going to use existing project I’ve created in my previous article How to style react forms using bootstrap 4. Download the project into your PC.
How Setup react, webpack, typescript, bootstrap?
After you download the project extract it to a folder and open a command window. Run the following npm commands;
 npm i or npm install
 npm run start
Then open up index.html file, you will see a from which collect book details.
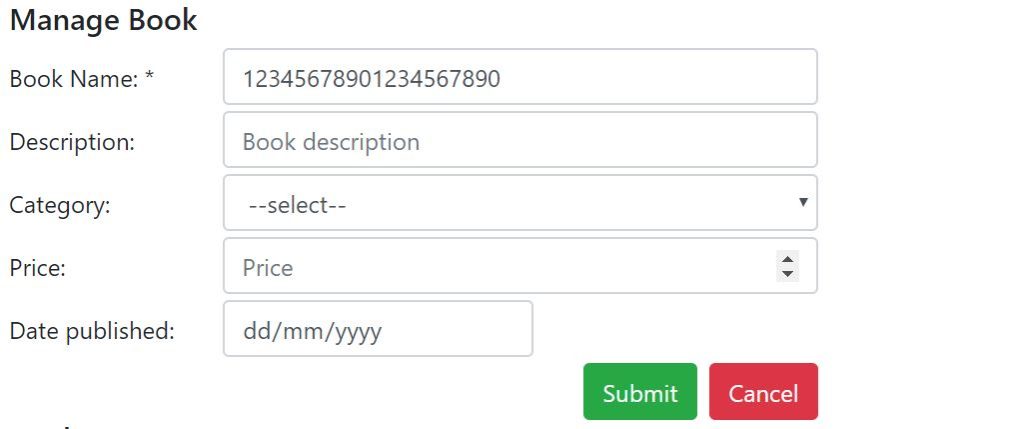
I will take this from to explain react validations one by one. I will be using bootstrap 4 validation classes to show validation messages
What are Bootstrap 4 validation classes?
Bootstrap 4 bundle up with very handy collection of validation classes which we will going to use for our form validations. Observe what the bootstrap 4 validation process does, basically it toggles two validation classes. One on the input control and the other on the message box. Bootstrap 4 uses is-invalid class on the input control and invalid-feedback on the validation message class.
How to handle input validations using reactjs?
In reactjs every DOM manipulation should happen through react state. Updating state will trigger virtual dom to render changes into UI. If you plan and structure you react state, handling errors is going to be very easy. If you look at the book react component, book is an object within the react state.
      //declare initial state
       this.state={
           book:{
               name:'',
               description:'',
               category:'',
               price:0,
               publisheddate:null
           }
       }
Likewise form errors also should be an object. I’m going to consider all the input values are required in this scenario.
How to manage errors using react state?
I’m going to add another object into react form state called errBook object and maintain all the error messages in it. How you do it ? first update your state interface as follows;
 //State interface
interface IBookState{
    book:{
        name:string;
        description:string;
        category:string;
        price:number;
        publisheddate:any;
    };
    errBook:{
       errname:string;
       errdescription:string;
       errcategory:string;
       errprice:string;
       errpublisheddate:string;
    }
}
Now we can set the initial react state together with error statuses as follows;
      //declare initial state
       this.state={
           book:{
               name:'',
               description:'',
               category:'',
               price:0,
               publisheddate:null
           },
           errBook:{
               errname:'',
               errdescription:'',
               errcategory:'',
               errprice:'',
               errpublisheddate:'',
            }
       }
When ever we come across any errors related to an input control we can update the corresponding error state and display the error message to the user.
When to validate a react form?
This is a vital decision developer has to make it at the inception. There are two options, one before submitting data into the server(backend) or in every input on change occur. Either case we use the state object store validation results.
Lets validate the first input control
How to use Bootstrap 4 validation classes to validate react forms?
Let’s change the display of name input control logic on the book form component as follows;
 <div className="form-group row mb-1">
    <label className="col-sm-3 col-form-label">Book Name: *</label>
    <div className="col-sm-9">
        <input type="text"
            id="bookname"
            className={this.state.errBook.errname!=''?
            "form-control is-invalid":
            "form-control"}
            name="bookname"
            placeholder="Book name"
            onChange={(e)=>{
                //collect the textbox current value
                var val=e.target.value;
                //using react setState() function to update
                //name property of the state->book object
                this.setState(prevState=>({
                    book:{ ...prevState.book,
                        name:val}
                }))
            }}
            onBlur={(e)=>{
                var val=e.target.value;
                //required field validation
                this.setState(prevState=>({
                    errBook:{...prevState.errBook,
                        errname:val==''?'Name cannot be blank.':''}
                }),()=>{console.log(this.state.errBook)})
            }}
            value={this.state.book.name}
            />
    </div>
</div>
As you can see I have added onBlur event handler to handle the errors and update the error state of the form. At the same time I’m using the className attribute to toggle the error class for input control. In this case if the name input has an error I’m appending is-invalid class into it. That will give the user red alert as follows;
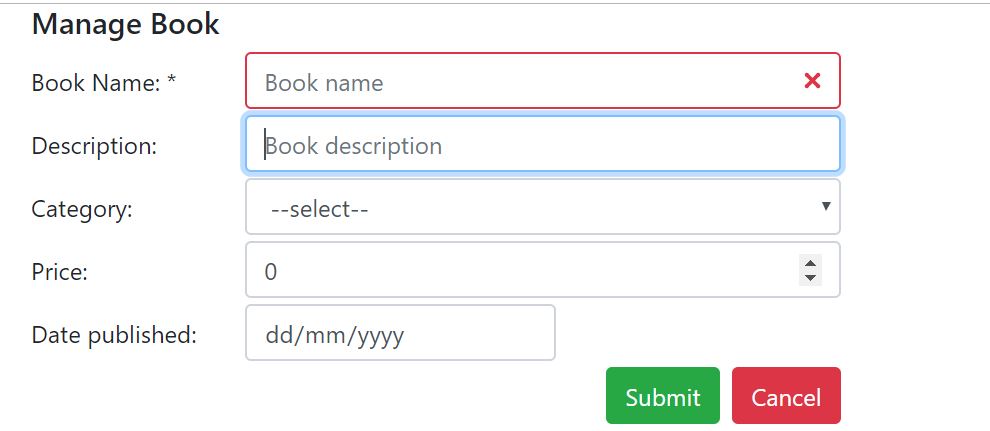
Now user knows that there is an error, but still he/she is unaware that, what is the real error is? So this is the time we show show them the message we store in the error state object. Let me show you how to display the error message for a given input. Add the following jsx code under the input.
 <div className={
    this.state.errBook.errname!==''?
        "invalid-feedback":'d-none'}>
            {this.state.errBook.errname}
</div>
What it does, if there is an error message in the error object for name input, we are displaying it to the user using this div. As you can see if there is an error message for errname then we are appending invalid-feedback bootstrap 4 validation class otherwise we are hiding the div by using another bootstrap class called d-none. Now save your code and refresh the browser and click on the name textbox a tab, you will see the input is highlighted and an error message underneath.
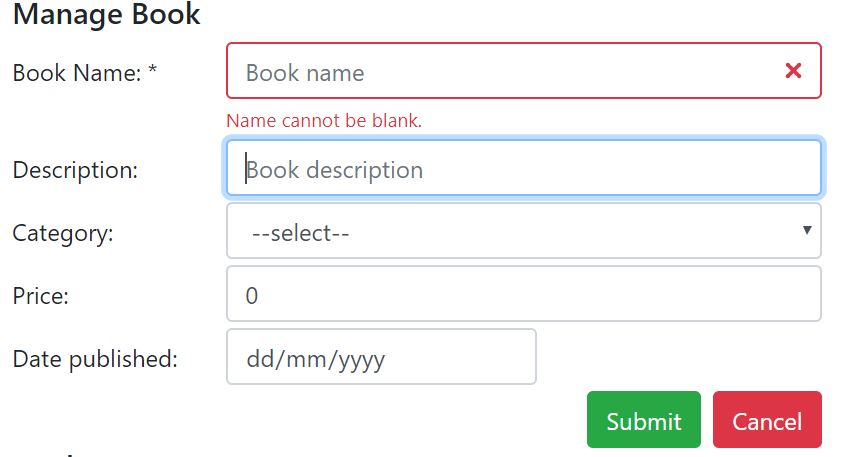
Now we have completed the first part of client side validations. Here is the complete code;
import * as React from 'react';
import * as ReactDom from 'react-dom';
export class Book extends React.Component<{},IBookState>{
constructor(props) {
super(props)
//declare initial state
this.state={
book:{
name:'',
description:'',
category:'',
price:null,
publisheddate:null
},
hasErrors:false,
errBook:{
errname:'',
errdescription:'',
errcategory:'',
errprice:'',
errpublisheddate:'',
}
}
}
render(){
return <React.Fragment>
<h5>Manage Book</h5>
<form>
<div className="form-group row mb-1">
<label className="col-sm-3 col-form-label">Book Name: *</label>
<div className="col-sm-9">
<input type="text"
id="bookname"
tabIndex={1}
autoFocus={true}
className={this.state.errBook.errname!=''?
"form-control is-invalid":
"form-control"}
name="bookname"
placeholder="Book name"
onChange={(e)=>{
//collect the textbox current value
var val=e.target.value;
//using react setState() function to update
//name property of the state->book object
this.setState(prevState=>({
book:{ ...prevState.book,
name:val}
}))
}}
onBlur={(e)=>{
var val=e.target.value;
//required field validation
this.setState(prevState=>({
errBook:{...prevState.errBook,
errname:val==''?'Name cannot be blank.':''},
hasErrors:val==''
}))
}}
value={this.state.book.name}
/>
<div className={this.state.errBook.errname!==''?
"invalid-feedback":'d-none'}>
{this.state.errBook.errname}
</div>
</div>
</div>
<div className="form-group row mb-1">
<label className="col-sm-3 col-form-label">Description:</label>
<div className="col-sm-9">
<input type="text"
id="description"
tabIndex={2}
className={this.state.errBook.errdescription!=''?"is-invalid form-control":"form-control"}
name="description"
placeholder="Book description"
onChange={(e)=>{
var val=e.target.value;
this.setState(prevState=>({
book:{...prevState.book,description:val}
}))
}}
onBlur={(e)=>{
var val=e.target.value;
//required field validation
this.setState(prevState=>({
errBook:{...prevState.errBook,
errdescription:val==''?'Description cannot be blank.':''},
hasErrors:val==''
}))
}}
value={this.state.book.description}
/>
<div className={this.state.errBook.errdescription!==''?
"invalid-feedback":'d-none'}>
{this.state.errBook.errdescription}
</div>
</div>
</div>
<div className="form-group row mb-1">
<label className="col-sm-3 col-form-label">Category:</label>
<div className="col-sm-9">
<select id="category"
tabIndex={3}
onChange={(e)=>{
var val=e.target.value;
this.setState(prevState=>({
book:{...prevState.book,category:val}
}))
}}
onBlur={(e)=>{
var val=e.target.value;
//required field validation
this.setState(prevState=>({
errBook:{...prevState.errBook,
errcategory:val==''?'Category cannot be blank.':''},
hasErrors:val==''
}))
}}
value={this.state.book.category}
className={this.state.errBook.errcategory!=''?
"is-invalid form-control":"form-control"}
>
<option value="">--select--</option>
<option value="Fiction">Fiction</option>
<option value="Story">Story</option>
<option value="Adventure">Adventure</option>
</select>
<div className={this.state.errBook.errcategory!==''?
"invalid-feedback":'d-none'}>
{this.state.errBook.errcategory}
</div>
</div>
</div>
<div className="form-group row mb-1">
<label className="col-sm-3 col-form-label">Price:</label>
<div className="col-sm-9">
<input type="number"
id="price"
className={this.state.errBook.errprice!=''?
"is-invalid form-control":"form-control"}
placeholder="Price"
value={this.state.book.price}
onChange={(e)=>{
//a special momant, since the state price
//property is number we need to use parseFloat()
//function to convert the text value in number
var val=parseFloat(e.target.value);
this.setState(prevState=>({
book:{...prevState.book,price:val}
}))
}}
onBlur={(e)=>{
var val =e.target.value;
this.setState(prevState=>({
errBook:{...prevState.errBook,
errprice:val==''?'Value cannot be blank':''},
hasErrors:val==''
}))
}}
/>
<div className={this.state.errBook.errprice!==''?
"invalid-feedback":'d-none'}>
{this.state.errBook.errprice}
</div>
</div>
</div>
<div className="form-group row mb-1">
<label className="col-sm-3 col-form-label">Date published:</label>
<div className="col-sm-5">
<input type="date"
id="datepublished"
className={this.state.errBook.errpublisheddate?
"is-invalid form-control":"form-control"}
placeholder="Date published"
value={this.state.book.publisheddate}
onChange={(e)=>{
var val=e.target.value;
this.setState(prevState=>({
book:{...prevState.book,publisheddate:val}
}))
}}
onBlur={(e)=>{
var val=e.target.value;
this.setState(prevState=>({
errBook:{...prevState.errBook,
errpublisheddate:val==''?'Published date cannot be balnk':''},
hasErrors:val==''
}))
}}
/>
<div className={this.state.errBook.errpublisheddate!==''?
"invalid-feedback":'d-none'}>
{this.state.errBook.errpublisheddate}
</div>
</div>
</div>
<div className="text-right">
<button type="button"
className="btn btn-success mr-2"
onClick={(e)=>{
console.log(this.state.hasErrors);
}}
>Submit</button>
<button
className="btn btn-danger"
type="button">Cancel</button>
</div>
</form>
<h5>Book State</h5>
<table className="table table-bordered">
<tr>
<td>Name</td>
<td>{this.state.book.name}</td>
</tr>
<tr>
<td>Description</td>
<td>{this.state.book.description}</td>
</tr>
<tr>
<td>Category</td>
<td>{this.state.book.category}</td>
</tr>
<tr>
<td>Price</td>
<td>{this.state.book.price}</td>
</tr>
<tr>
<td>Published Date</td>
<td>{this.state.book.publisheddate}</td>
</tr>
</table>
</React.Fragment>
}
}
//State interface
interface IBookState{
book:{
name:string;
description:string;
category:string;
price:number;
publisheddate:any;
};
hasErrors:boolean;
errBook:{
errname:string;
errdescription:string;
errcategory:string;
errprice:string;
errpublisheddate:string;
}
}
export default Book;
Above code will show you error messages and error status of the input control. But the code is a little smelly one for me. When you write production level code the best practice is to refactor your code and remove repeating code blocks as much as you can.
How to refactor react event handlers?
At a glance you can notice that two event handlers onChange() and onBlur() perform almost the same action for all the controls. So we can think of one handler for each. The other repetitive code would be the display of an error message. There can be more I will stick to these three. Let’s optimise the code now.
You can add the following code to handle onchange() event of inputs;
 handleOnChangeInput (e) {
    const name = e.target.name;
    const value = e.target.value;
    this.setState(prevState=>({
        book:{...prevState.book,[name]: value}}
        ));
    }
This event handler depends on control event object to extract values. So in all the controls you need to set the value and name properties correctly. Another point to remember is the book state object should have the same names as the control names. Then key value pairs should map each other because we are using key value pairs for update state. This process is called ES6 array destructuring.
Add the following code block the handle onBlur() events;
 handleOnBlurInput (e) {
        const realName=e.target.name;
        const name = 'err'+realName;
        var errMessage = "";//e.target.value==''?"Error":"";
        switch (realName){
            case 'name':
                errMessage=e.target.value==''?"Book name cannot be blank.":"";
                break;
            case 'description':
                errMessage=e.target.value==''?"Book description cannot be blank.":"";
                break;
            case 'category':
                errMessage=e.target.value==''?"Book category cannot be blank.":"";
                break;
            case 'price':
                errMessage=e.target.value==''?"Book price cannot be blank.":"";
                break;
            case 'publisheddate':
                errMessage=e.target.value==''?"Book date published cannot be blank.":"";
                break;
        }
        this.setState(prevState=>({
            errBook:{...prevState.errBook,[name]: errMessage}}
            ));
      }
The real magic happens at onBlur event. Handling onBlur event is a bit of a tricky one since we use key value pairs to update state. In this case we need to prefix state error properties correctly as follows;
Example the error property for name should be errname. It is case sensitive so all should be lowercase.
Since we use following code to update the error state;
 this.setState(prevState=>({
            errBook:{...prevState.errBook,[name]: errMessage}}
            ));
We need to create correct name key value as well as corresponding error message for each input field. To get the name key you can always prefix the event.target.name with err that way it matchup with state error object property names. Next thing I’m doing is using a switch statement to generate input wise error messages.
Now you can comment out code within the events and use the corresponding event handlers to handle them. As you can see we can make our code much cleaner and readable with a simple refactoring.
Next thing I’m going to do is create a functional component for display error messages as follows;
 const DisplayErrors=(p:{errname:string})=>{
     return <div className={p.errname!==''?
                "invalid-feedback":'d-none'}>
                {p.errname}
            </div>
 }
You can use this component as follows;
<DisplayErrors errname={this.state.errBook.errname}/>
Change all the input error message display with above code block. Then delete all the commented code from event handlers. Now you can notice how clean our book react component with validations. When you are writing production level code always take a moment to refactor you code rather than waiting till the last minute. Once you complete your code it is too late as well as more dependencies to take care. It is better to do it, time to time. Save the code and refresh the browser form validation works as it is.
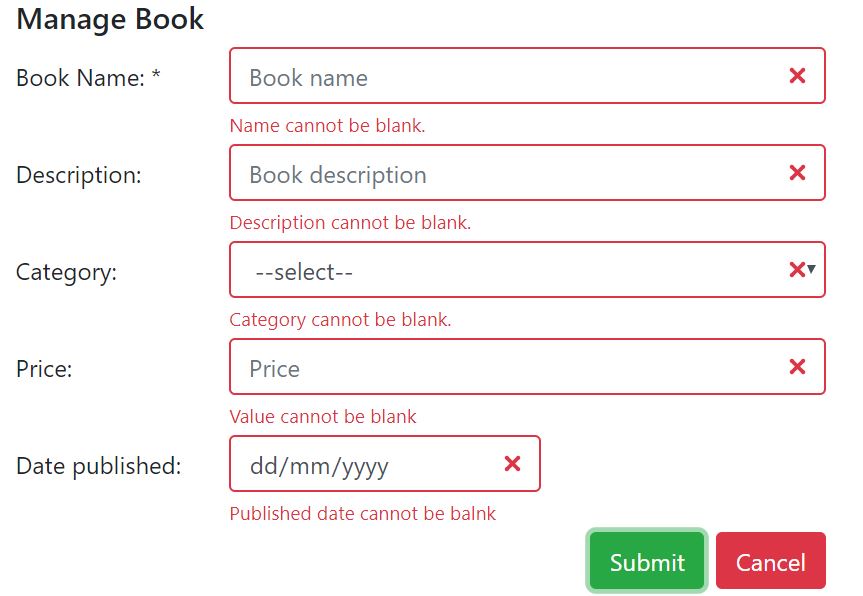
Above code will do the validation when users navigate from one control to another. But when user click on the save button we need to do one last round of validations before we push data in the server. Let’s do the on save validations as follows;
 private validateBook():boolean{
         var errName='';
         var errDesc='';
         var errCategory='';
         var errPrice='';
         var errPublishedDate='';
        var hasErrors=false;

        if(this.state.book.name==''){
            errName='Book name cannot be blank';
            hasErrors=true;
        }

        if(this.state.book.description==''){
            errDesc='Book description cannot be blank';
            hasErrors=true;
        }

        if(this.state.book.category==''){
            errCategory='Book category cannot be blank';
            hasErrors=true;
        }
        if(this.state.book.price==null){
            errPrice='Book price cannot be blank';
            hasErrors=true;
        }
        if(this.state.book.publisheddate==null){
            errPublishedDate='Book price cannot be blank';
            hasErrors=true;
        }
        this.setState(prevState=>({
            errBook:{...prevState.errBook,
                errname: errName!=''?errName:'',
                errdescription:errDesc!=''?errDesc:'',
                errcategory:errCategory!=''?errCategory:'',
                errprice:errPrice!=''?errPrice:'',
                errpublisheddate:errPublishedDate!=''?errPublishedDate:''
            }
            ,hasErrors: hasErrors
        }))
        return hasErrors;
     }
The above function will do the final check before pushing it to server. Based on your business requirement you can think of further validations and include them in this method.
You can find live demo of react form validations here
You can download the full source code from here

Share your thoughts